-
How to solve verification code reception failure?
-
How to use gesture navigation on MuMuPlayer?
-
How to Launch MuMuPlayer as Administrator?
-
How to set Operation Recording in MuMu Player
-
Prompt Insufficient Disk Space when installing software
-
MuMu stops responding while loading, freezes at 99%, or prompts a reason unknown error
-
Backup Games&APP File Guide
-
Can't log in to Google account on emulator
-
What if the emulator produces no sound
-
Google play store prompts that your device doesn't support the game
-
How to eliminate lags
-
How to import and export key plan in the emulator
-
How to improve the resolution (Up to 2k)
-
How to Install Apps on MuMu Player
-
OBS cannot capture the emulator interface
-
Screen Display Issues
-
How to set the camera rotation in the emulator
-
Unable to log in to the game due to system time error
-
How to view MuMu's and your PC's specification
-
What if I keep on failing to access BIOS because the startup happens too fast?
-
Way to solve Graphics spec. too low for dx 11.0 or OpenGL 4.3
-
How to fix the issue "MuMuPlaye virtual machine process exits abnormally"?
-
Installing MuMuPlayer for Mac: A Quick Guide
-
How to Play Android Games on Macbook with MuMuPlayer for Mac
-
Free Trial & Purchase/Renew Membership
-
How to Fix Email Verification Code Not Receiving on MuMuPlayer?
-
How to Fix Payment Failure on MuMuPlayer?
-
Beginners' Guide: How to Use StarDesk Remote Desktop
-
What Is StarDesk Remote Desktop and How to Start
-
How to Fix the "Unsupported Device" Error When Launching Null's Royale, Null's Brawl, or Null's Clash?
-
Recommended Settings and FAQ for Destiny: Rising on Mac
-
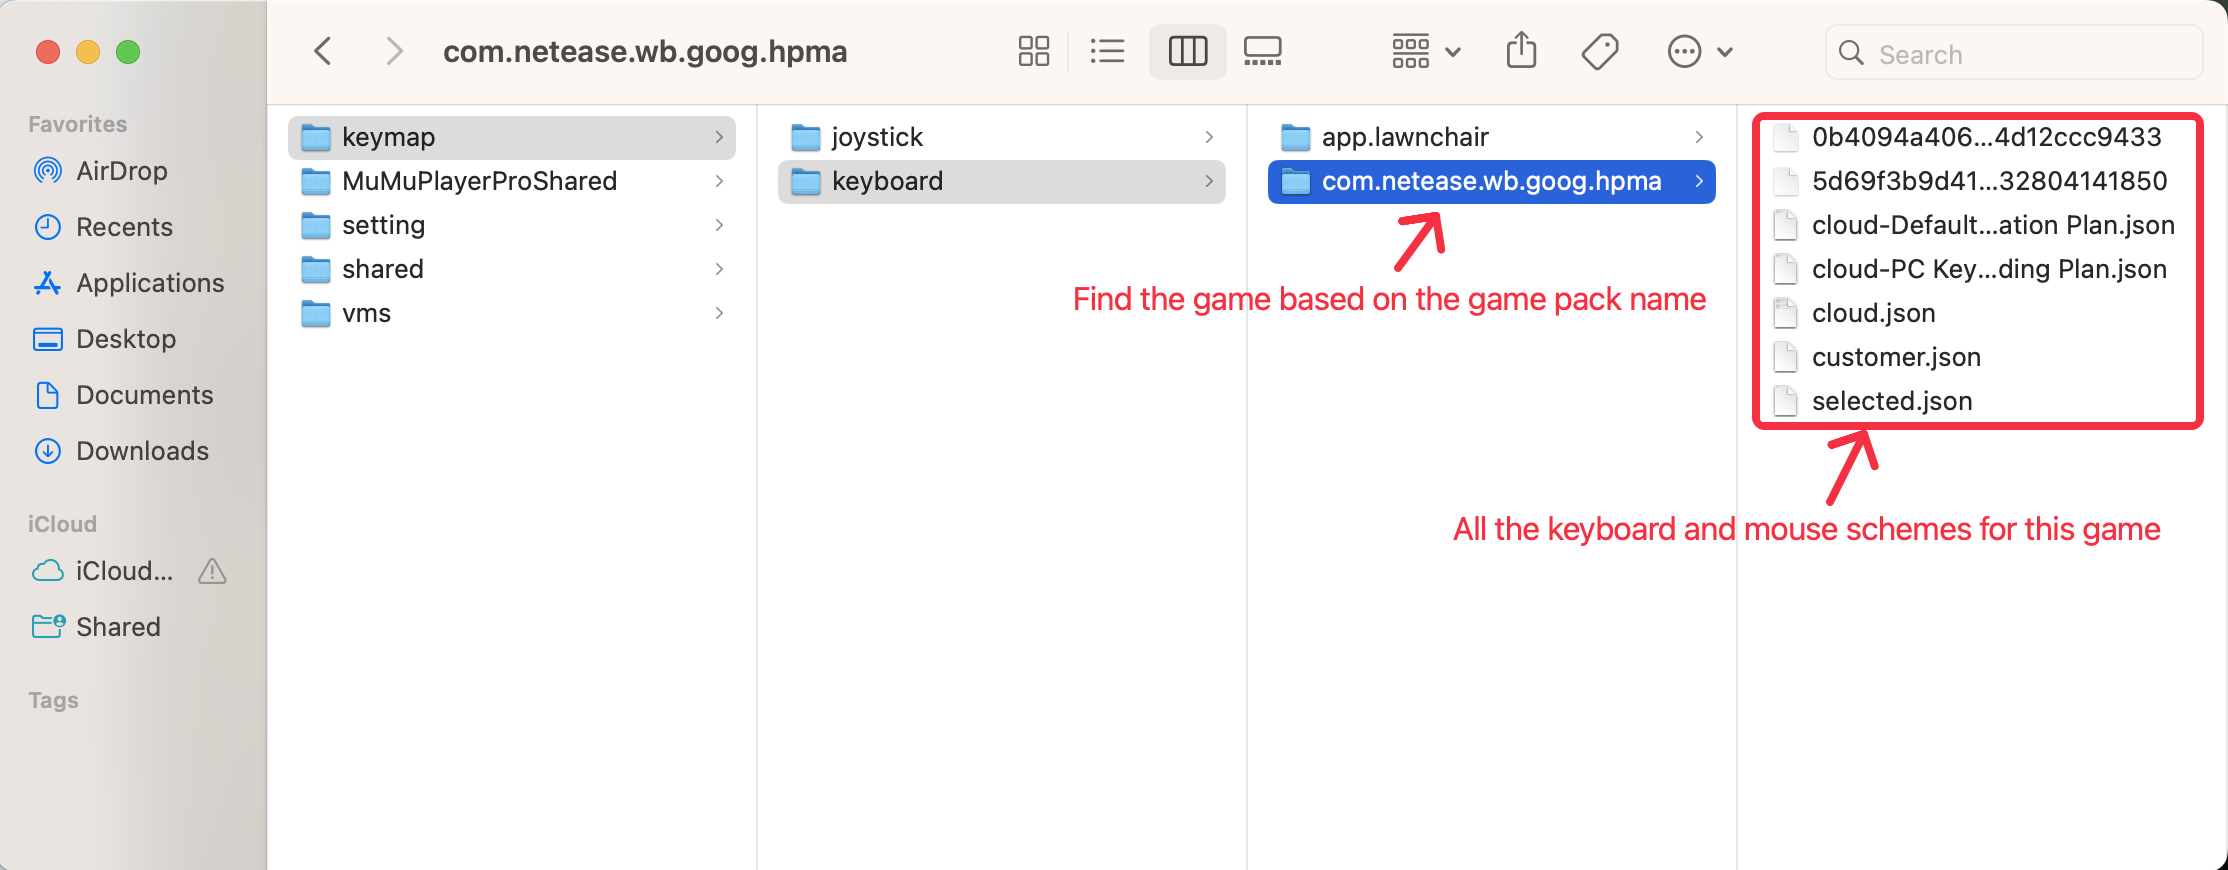
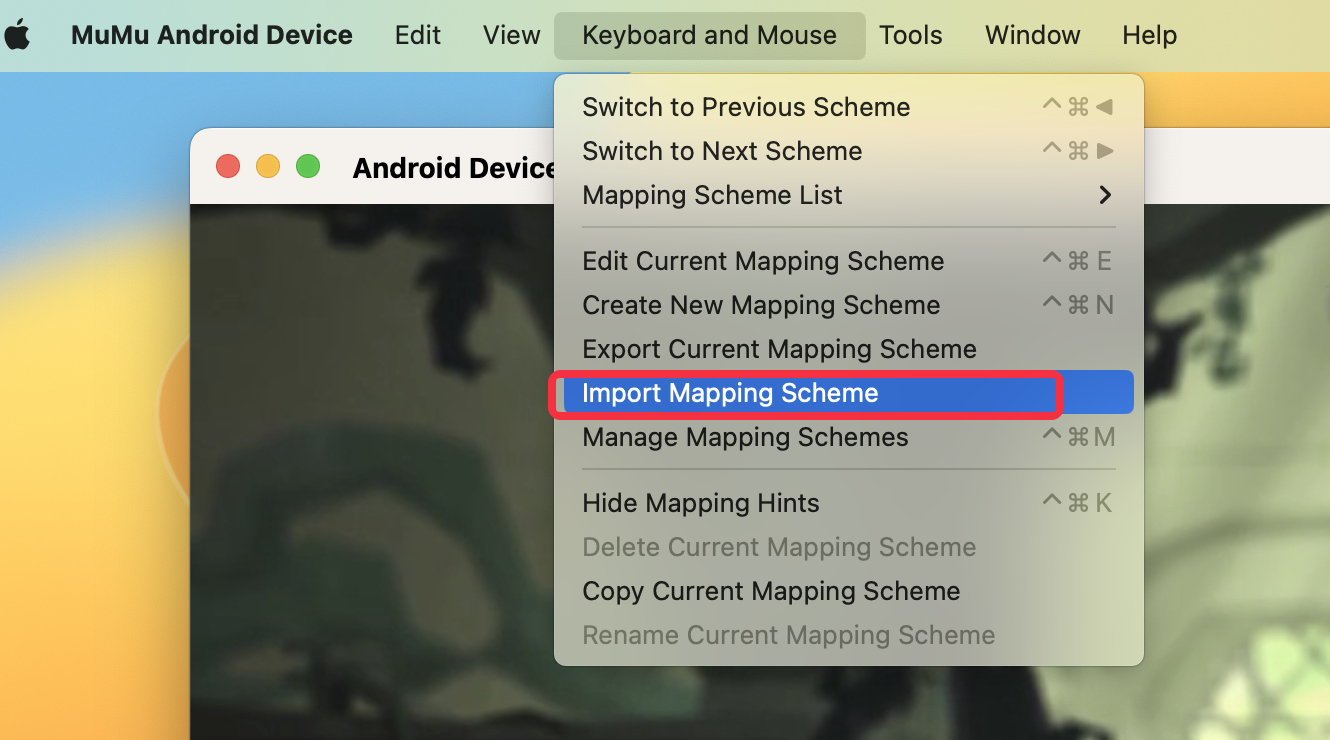
How to fix Destiny: Rising cloud key mapping scheme loading failure?
-
How does MuMuPlayer connect to adb?
-
How to change language on MuMuPlayer
-
Minimum System Requirements for MuMuPlayer in Windows
-
How to disable firewalls?
-
Disable Hyper-V and turn off core isolation
-
How to install DirectX 11
-
Developers' Essentials: Manual
-
How to enable VT
-
Enabling VT in Acer PCs
-
Enabling VT in HP PCs
-
Enabling VT in Gigabyte PCs
-
Enabling VT in Lenovo PCs
-
Enabling VT in ASRock PCs
-
Enabling VT in ASUS PCs
-
Enabling VT in Dell PCs
-
Enabling VT in MSI PCs
-
Enabling VT in Toshiba PCs
-
How to update the graphics driver
-
MuMuPlayer 12 installation error code solution
-
How to enable high FPS in MuMuPlayer?
-
How to fix network error in MuMuPlayer?
-
MuMu stops responding while loading or freezes at 98%
-
How to resolve the issue where Hyper-V cannot be disabled after upgrading Windows 11 to version 24H2?
-
How to run multi-instance?
-
How to debug apps with Android Studio and MuMuPlayer for Mac?
-
What if 32-bit applications cannot be installed?
-
What to do if I failed to log in with Gmail?
-
Why my Gamepad won't work after connection?
-
How to customize your own Device Storage Directory?
-
What to do if there is an error with your Android Device Storage Directory?
-
How to use developer support function?
-
Notice of Membership Purchase——Everything you need to know
-
How to contact us for support?
-
Keyboard, Mouse, and Gamepad Mapping Guide
-
How to install apps on MuMuPlayer for Mac
-
How to install certificates & packet capture?
-
How to transfer files?
-
How to adjust the volume?
-
How to customize the toolbar?
-
How to connect ADB?
-
How to enable graphics enhancement?
-
How to solve insufficient disk space when installing software?
-
How to solve installation failure for Apple Silicon Mac?
-
How to solve payment failure?
-
What if experiencing lag on first game load?
-
How to solve update error?
-
MuMuPlayer Macro Key Mapping Guide
-
What to do if Google Billing Service does not auto start when doing in-app purchase in MuMuPlayer?
-
How to fix the error Code:22 when launching Summoners War on MuMu Player?
-
How to drag labels and split screen in MuMuPlayer?
-
What should I do if MuMu Player prompts that Hyper-V is not disabled after Windows 11 system update?
-
What to do if Blue Archive download from Google Play isn't compatible with my device?
-
How to turn off the tap display on MuMuPlayer?
-
Frequently asked questions about MuMu Player 12 split screen function
-
Arknights operation recording automatic execution tutorial
-
Operation Recording Tutorial for Arknights
-
How to solve the problem of Arknights stuck on loading resource packs?
-
How to improve performance when running Multi-instances on MuMu Player 12?
-
What to do if you cannot login to Warcraft Rumble
-
MuMu Player 12 backup data method
-
How to fix the issue that MuMu Player 12 prompts "insufficient disk space" but computer disk is free?
-
How to fix the issue that "the file is occupied during data migration on MuMuPlayer"?
-
MuMuPlayer Keyboard and mouse key editing tutorial
-
MuMuPlayer File Transfer Tutorial
-
MuMuPlayer Screen Recording Tutorial
-
MuMuPlayer Multi-instance function tutorial
-
MuMuPlayer operation recording tutorial
-
MuMuPlayer Synchronization Function Tutorial
-
MuMuPlayer App cloner guide
-
MuMuPlayer 12 installation error code solution
-
How to fix the DNS resolution failure when MuMuPlayer downloads/updates?
-
How to fix graphics card driver crashes in MuMuPlayer?
-
How to fix the issue "MuMuPlaye virtual machine process exits abnormally"?
-
How to fix Vulkan mode unavailable error?
-
How to fix the issue that the storage space of the MuMuPlayer is insufficient?
-
How to fix the initialization failure of the emulator component when updating MuMuPlayer ?
-
How to fix MuMuPlayer startup failure with the prompt "Please try to exit the antivirus software and restart the emulator"?
-
How to reinstall MuMuPlayer?
-
How to solve MuMuPlayer Startup Failure
-
PGSharp Download and Installation Guide
-
Honkai: Star Rail Operation Guide
-
MuMuPlayer Download and Installation Guide
-
The solution to PGsharp getting stuck on the loading page
-
How to use Virtual Go Plus Function in PGsharp with MuMu Player
-
How to fix Clash of Clans crash
-
What should I do if Goddess of Victory: NIKKE crashes when loading 3/10?
-
MuMu stops responding while loading or freezes at 40%
-
MuMu stops responding while loading or freezes at 60%
-
How to Solve Emulator Crashing with An Unknown Error?
-
What should I do if the game crashes multiple times during playing?
-
What should I do if the game starts up with a black screen?
-
How to Play Punishing: Gray Raven at 120 FPS on PC with MuMu Player
-
How to solve Pokémon GO Crashing on MuMu Player 6?
-
How to replace a 32-bit emulator with a 64-bit emulator
-
Recurring Program not responding
-
The desktop becomes a different size after starting the emulator and does not work properly
-
The emulator desktop has a splash screen and diagonal icons
-
Enable VT on Soyo
-
Enable VT on Jetway
-
Enable VT on Maxsun
-
Enable VT on Biostar
-
Enable VT on Colorful
-
MuMu stops responding while loading or freezes at 100%
-
How to install XAPK files in the emulator
-
Games currently incompatible with MuMu Nebula
-
How to use the Multi-Instance function
-
How to Reinstall Graphics Driver
-
How to uninstall MuMuPlayer properly
-
How to download Blue Archive on MuMu Player
-
How to switch installation path
-
How to switch between dedicated and integrated graphics cards
-
How to free up disk space
-
Function Shortcuts of MuMu Player
-
How to deal with Lock Screen Emergency
-
How to set Operation Recording in MuMu Player
-
Ways to solve Download Error: environment problem
-
Installation & Startup Error Codes
-
Google play store prompts that your device doesn't support the game
-
Unable to log in to the game due to system time error
-
How to export the files in the emulator to the computer
-
How to import files from the computer to the emulator
-
How to hide and show key mapping in the emulator
-
How to set the camera rotation in the emulator
-
How to record video in the emulator
-
How to zoom the map in the emulator
-
How to import and export key plan in the emulator
-
Prompt Insufficient Disk Space when installing software
-
Click on the emulator 3 times and the screen will zoom in
-
OBS cannot capture the emulator interface
-
Can't log in to Google account on emulator
-
How to Install Apps on MuMu Player
-
Conflicted Boss Key
-
How to fix the problem of camera starting up unexpectedly
-
Backup Games&APP File Guide
-
Method to check MuMu Startup Failure
-
How to solve Network problem has been repaired pops up repeatedly
-
Key Mapping for Single Click, Double Strike, D-pad, Aim, Fire, etc.
-
Way to solve Graphics spec. too low for dx 11.0 or OpenGL 4.3
-
Developers' Essentials: Manual
-
Error Codes for Emulator Installation and Startup Errors
-
What if the emulator produces no sound
-
MuMu stops responding while loading or freezes at 45%
-
MuMu stops responding while loading or freezes at 30%
-
Network environment error displayed in emulator's top right corner
-
How to install DirectX 11
-
How to view MuMu's and your PC's specification
-
How to disable firewalls?
-
How to eliminate lags
-
How to play Free Fire on perfectly smooth 120 fps
-
MuMu stops responding while loading, freezes at 99%, or prompts a reason unknown error
-
How to enable VT
-
How to improve the resolution (Up to 2k)
-
How to enable high FPS mode
-
The PC goes into blue screen after starting the emulator
-
Disable Hyper-V and turn off core isolation
-
MuMu stops responding while loading or freezes at 10%
-
Screen Display Issues
-
The Emulator Failed to Respond
-
What if the emulator still requests for VT to be enabled even after the setting has been enabled in BIOS?
-
Enabling VT in Toshiba PCs
-
Minimum System Requirements for MuMu Player in Windows
-
Enabling VT in MSI PCs
-
Enabling VT in Lenovo PCs
-
Enabling VT in HP PCs
-
Enabling VT in Gigabyte PCs
-
Enabling VT in Dell PCs
-
Enabling VT in ASUS PCs
-
Enabling VT in ASRock PCs
-
Enabling VT in Acer PCs
-
How to update the graphics driver
-
What if I keep on failing to access BIOS because the startup happens too fast?
-
How to Change the Display from 16-Bit Color to 32-Bit Color